2013-04-18 - 4453.500 - Process Procedure - LSMW for Filling Orders Setup Table #SalesDistribution
PROCESS PROCEDURE
4453.500 - LSMW for Filling Orders Setup Table
Summary Description
LSMW Procedure steps for filling Orders Setup Table in NEP.
Admin Info
| Title |
LSMW Procedure steps for filling Orders Setup Table in NEP |
| Requested by |
Mark Harris |
| Created Date |
04-16-2013 |
| Approved by |
Uday Kumar P |
| Approved Date |
04-18-2013 |
| Status |
Complete |
Detailed Description
Please find below the detailed steps involved in LSMW for filling Orders Setup Table in NEP:
Step 1: Login to NEP System & goto TCode LSMW.
Step 2: Enter Project Name "OPEN_ORDER", Subproject Name "OPEN_ORDER" and Object Name "BLOCK_OPEN_ORD" & click Execute button.
Step 3: Select Radio button "Maintain Field Mapping and Conversion Rules" and we have to change NAME and DATE everytime while executing LSMW based on Tcode OLI7BW.
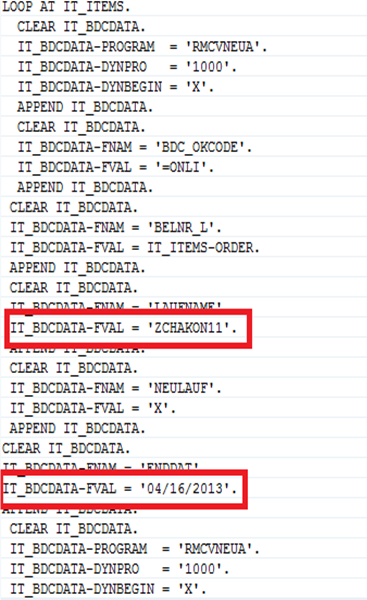
In END_OF_TRANSACTION event code we need to change the code for IT_BDCDATA-FVAL with Updated Name and IT_BDCDATA-FVAL with Updated Date.
Note: Date should be greater than current system date.
Step 4: Select the Radio button "Specify Files" and assign the files to legacy data. There are two files to assign:
(a) For main header (Main).
(b) Sales orders (Items).
Note: Please find attached sample files for both Main and Items data for sales, deliveries and invoices:
Heading main.txtSales Orders Item.txtDeliveries Item.txtInvoices Item.txt
Step 5: Select the Radio button "Read Data" & click Execute button.
Step 6: Select the Radio button "Display Read Data" and click Execute button (It is not mandatory step but if we want to cross check what data is read then we can use).
Step 7: Select the Radio button "Convert Data" & click Execute button.
Step 8: Select the Radio button "Create Batch Input Session" & click Execute button.
Step 9: Select the Radio button "Run Batch Input Session" and we have to select Job name & click on Execute button.
Step 10: Select the Radio button "Background" & click on Process button for monitoring the background job.
Process Flow & Navigational Steps
Please find below the detailed steps involved in LSMW Updation Process along with the relevant screenshots:
Step 1: Login to NEP System & goto TCode LSMW. Enter Project Name "OPEN_ORDER", Subproject Name "OPEN_ORDER" and Object Name "BLOCK_OPEN_ORD" & click Execute button as seen below:

Step 2: LSMW Process Checking starts one by one. This is the main Screen for LSMW Process:

Step 3: Select Radio button "Maintain Field Mapping and Conversion Rules" and we have to change NAME and DATE everytime while executing LSMW based on Tcode OLI7BW:
This is a very important step where we have to change NAME and DATE everytime while executing this LSMW.
In END_OF_TRANSACTION event code we need to change the code for IT_BDCDATA-FVAL with Updated Name and IT_BDCDATA-FVAL with Updated Date.
Note: Date should be greater than current system date.

For Example. In the above code we have highlighted the code where the name(ZCHAKON11) and date(04/16/2013) has to be changed everytime(Date is to be greater than system date).
Step 4: Select the Radio button "Specify Files" and assign the files to legacy data. There are two files to assign:
(a) For main header (Main).
(b) Sales orders (Items).
Note: Please find attached sample files for both Main and Items data.
Goto Display - Change mode to assign the above files and save it:

Step 5: Select the Radio button "Read Data" & click Execute button:

Step 6: Select the Radio button "Display Read Data" and click Execute button (It is not mandatory step but if we want to cross check what data is read then we can use):

Step 7: Select the Radio button "Convert Data" & click Execute button. It converts the whole data to tables and will take some time to convert based on the volume of data:

Step 8: Select the Radio button "Create Batch Input Session" & click Execute button:

Step 9: Select the Radio button "Run Batch Input Session" and we have to select Job name & click Execute button:

Step 10: Select the Radio button "Background" & click on Process button for monitoring the background job:
.

Common Issues
1. In case the LSMW is used for filling Billing documents setup table, repeat the same process as above with the following modifications:
Project Name "OPEN_BILLING"
Subproject Name "OPEN_BILLING"
Object Name "DELIVERIES"
2. In case the LSMW is used for filling Delivery documents setup table, repeat the same process as above with the following modifications:
Project Name "OPEN_DELIVERY"
Subproject Name "OPEN_DELIVERY"
Object Name "DELIVERIES"
Resolutions
In case the LSMW is used for filling Billing and Delivery documents, follow the changes as mentioned above.
Release Information
None